JoomConnect Blog
Facebook 101 - Hiding Your Personal Profile [Social Media 101]
![Facebook 101 - Hiding Your Personal Profile [Social Media 101]](http://www.joomconnect.com/images/easyblog_articles/703/b2ap3_large_S887P8-Hide-Facebook-resized.png)
Successful MSP marketing relies on social media, including Facebook: the social media platform that people love to hate. We’ve come across so many MSPs adamantly against this platform, despite the benefit that it can bring to their business.
The problem is, if you hate Facebook enough to not have your own personal profile, then you can’t manage your Facebook Business Page.
We’ve already discussed the incorrect option that some people take: creating a fake profile to manage the page. What you can do instead is change the settings on your own personal Facebook profile so that you’re more or less ‘hidden’ from those using the platform.
MSP Marketing: How Do I ‘Hide’ My Personal Facebook Account?
To hide your Facebook profile from the general public, you’ll have to adjust your profile’s settings. Here is how to do so from a desktop computer.
1. Login to your Facebook profile, and click the arrow in the upper right corner of the Facebook page. Then, click “Settings”.
2. In the menu on the left, click “Privacy”. This will take you to a page titled, “Privacy Settings and Tools”, which should look something like the image below.
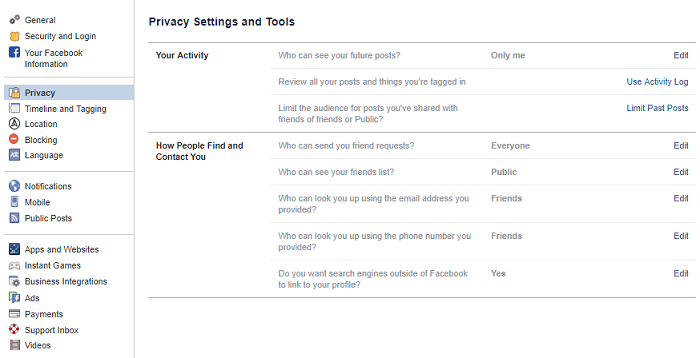
3. Under the “Your Activity” section, edit “Who can see your future posts?” and change it to “Only me”. You can then click the “Limit Past Posts” link to change all of your past posts to be viewed by “Friends Only”. Other options:
- If you’re more interested in hiding your profile from people not in your list of friends, you can select “Friends”, which will only allow your posts to be viewed by those on your friends list.
- You can select the “Friends except…” options to only allow your posts to be seen by some of your friends.
- You can also create a “Custom” option to “include and exclude friends and lists”, but keep in mind this will require you to update and maintain your settings if you are adding new people to your Friends list.
5. Under the “How People Find and Contact You” section, you can do the following:
- Set “Who can send you friend requests?” to “Friends of friends”
- Set “Who can see your friends list?” to “Only me”, “Friends”, or “Custom”
- Make sure “Who can look you up using the email address you provided?” is set to “Friends”
- Make sure “Who can look you up using the phone number you provided?” is set to “Friends”
- Edit “Do you want search engines outside of Facebook to link to your profile?” and uncheck the box that allows this.
6. In the menu on the left hand side, go to “Timeline and Tagging”. This will take you to a page that should look similar to the following:
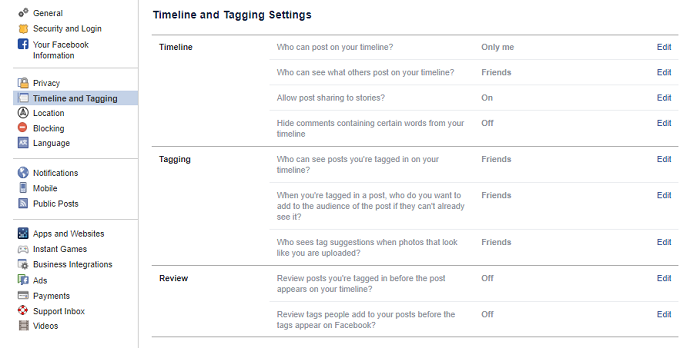
7. Under the “Timeline” Section:
- Set “Who can post on your timeline?” to “Only me”
- Set “Who can see what others post on your timeline?” to “Only me”
- Edit “Allow post sharing to stories?” and set it to “Disabled” to turn this off
8. Under the “Tagging” Section:
Edit “Who can see posts you're tagged in on your timeline?” and change it to “Only me”
Change “When you're tagged in a post, who do you want to add to the audience of the post if they can't already see it?” to “Only me”
Change “Who sees tag suggestions when photos that look like you are uploaded?” to “No one”
9. Under the “Review” Section, edit “Review posts you're tagged in before the post appears on your timeline?” and select “Enabled” to make it so that you have to approve friends tagging you. When they do tag you, you can choose to not accept the tag so that you won’t be tagged in that particular post.
10. In the menu on the left, go to “Location” and make sure that your location history is off.
Your Facebook Profile Is Now (Mostly) Hidden!
This is about as close as you can get to “erasing” your Facebook Profile apart from deactivating it all together. Since deactivating your profile wouldn’t allow you to manage your Facebook Business Page, this is the best solution if you want to be the one in charge of managing your Business Page.
If you would like additional insight into using Facebook as tool to market your MSP from the perspective of a small to medium-sized MSP, check out the other blogs we’ve written on the subject, and ask any questions that you have here.
In order to market your MSP, you must take advantage of every tool you can, including social media. If you need additional help getting your social media channels the way you want them to be? We have a service for you! The Ultimate Social Media Rig can set up and configure your accounts on Facebook, Twitter, LinkedIn, and Youtube for you to your liking, and will train you on social media best practices. Reach out to us to learn more.
About the author
![]()

Blog Categories
Grab this article

Comments