JoomConnect Blog
A Beginner's Guide to Facebook Advertising - Creating an AD [3 of 7]
![A Beginner's Guide to Facebook Advertising - Creating an AD [3 of 7]](http://www.joomconnect.com/images/easyblog_images/510355/b2ap3_large_b2ap3_thumbnail_BlueFacebook400.png)
Part 3 of 7 - Creating an Ad [Series]
Facebook Ads have the ability to transform your company and dramatically increase your leads without destroying your budget. If you want to reach 1.55 billion Facebook users that could potentially turn into your clients, then Facebook Advertising is right for you. The following will tell you the preliminary steps you need to know to create a Facebook Advertisement of your very own!
STEP 1. Establish and Create your Facebook Business Page
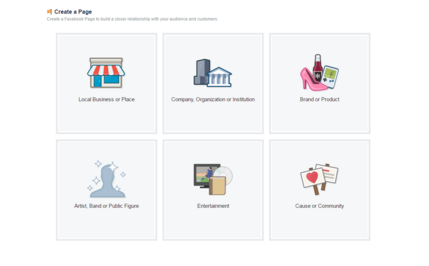
If you already have a Facebook Business Page, SKIP this step and continue on to step 2. If not, you can create your page here. You will be instructed to select a category, please choose the category that best describes your business. It is important to provide as many details as possible when creating a Facebook Business Page (Keep in mind that your viewers are looking to this page to find out more information, you need to provide it for them). Properly branding your Facebook Page with cohesive images is also important. You want to keep your branding consistent throughout all of your marketing and advertising initiatives.
STEP 2. Create Goals and Objectives.
Before enacting any type of marketing initiative, formulating goals and objectives should happen first. Although your goals with marketing as a whole may be to generate leads, and increase revenue, goals should also be set for each specific initiative. SMART goals are the easiest to track and measure. SMART is an acronym for specific, measurable, attainable, relevant, and time-based. For example, the goal of your advertisement might be to have 10 sign ups for your BDR Lunch and Learn within a one month time frame. By creating this goal, you can now easily select your objectives, and metrics. Let’s begin with objectives. Once you have formulated your goal, objectives should be chosen on the ad manager. The ad manager can be found on this page. The screen below should be displayed:
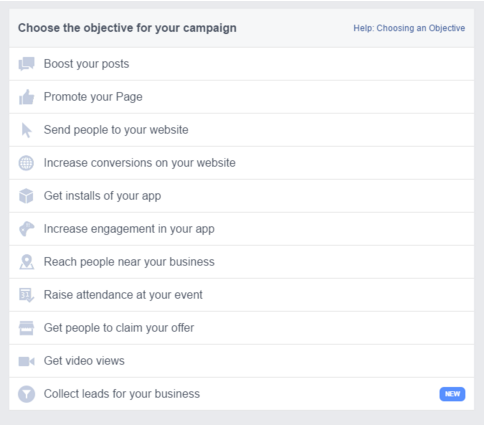
Depending on the chosen goal, Facebook will provide a variety of options. For example, if “Raise attendance at your event” is selected, Facebook will then prompt you to select one of your previously created events (assuming the event has been created on Facebook). The options vary depending on the selected objective. Once selected, you will be prompted to confirm your account info (country, currency, and time zone).
STEP 3. Choose Your Audience
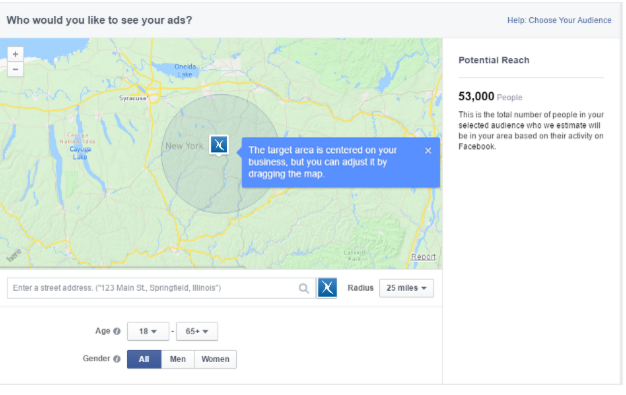
Choosing the right audience is crucial to a successful marketing initiative. Luckily Facebook provides its business page owners with in depth targeting parameters. Audiences can be customized according to behaviors, interests, demographics, connections, age range, language, and location. Once your preferences are selected, Facebook will provide a potential reach number which will show you an estimated number of how many people will see your advertisement. Keep in mind that the more people that see your advertisement, the more chances you have to increase leads, and build your brand awareness.
STEP 4. Set Your Budget & Schedule
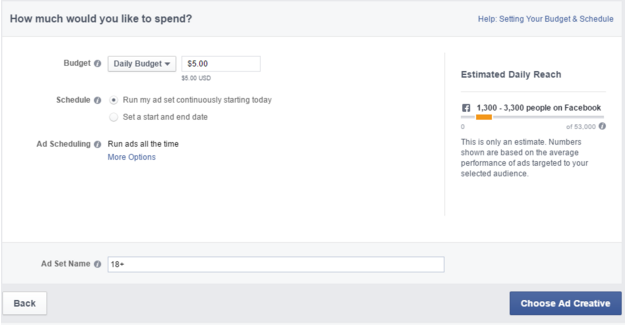
Facebook is currently the cheapest while beneficial advertising platform that is available to business owners. Even with a $5 daily budget your advertisements can reach a large audience. Once your budget is set Facebook will provide a potential reach, which may prompt you to increase or decrease your current budget. Keep in mind that the minimum budget is $5.00 per day. You then have the option to schedule when you would like your advertisement to begin, and end - if you’d like to set an end date. Please refer to the image below.
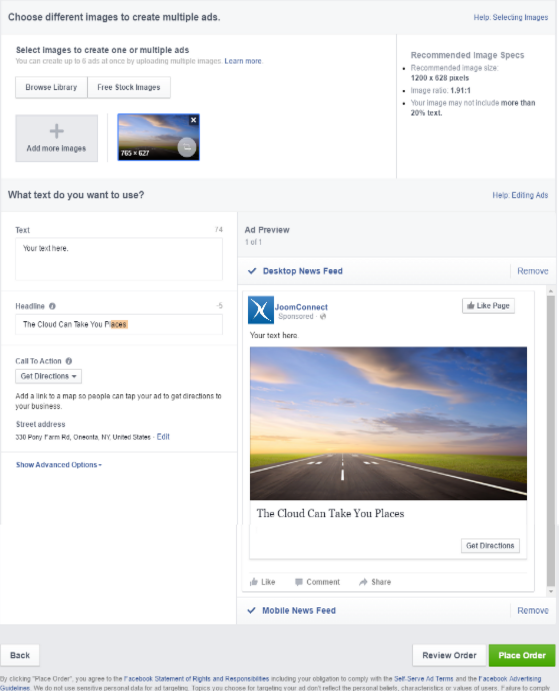
STEP 5. Upload and Edit Ad, and Place Order
Once all of your preferences are set and saved you will create your advertisement. You can then choose the placement, images, headline, and content of the ad. Advertisements are allowed a maximum of 5 images, while the headline is limited to 25 characters or less. A character tracker is available for your convenience. (Additional characters past the 25 count are highlighted in orange). Facebook allows for 90 characters of content beneath the advertisement. Be sure to be concise. We recommend having a second pair of eyes read over the content to make sure it is sending your message as effectively as possible. Once these decisions have been made you are able to choose your placement preferences. You may choose from desktop news feed, mobile news feed, right column, or audience network. When choosing placement you might want to think of where advertisements are most noticeable to you, while you are on Facebook. Consider asking your friends, and colleagues too, if you’re having trouble deciding. A study from Socialbakers shows that 30% of Facebook Advertising revenue came from advertisements that were placed on the mobile news feed. Once you are finished editing your advertisement, you will click the green “place your order” button. Please note that your advertisement will need to be reviewed and approved by Facebook before it can go live. Once it is you will receive a confirmation email.
STEP 6. Create a Facebook Ads Report
Facebook provides its business page owners with a series of steps to follow that will assist in generating your report, which will show how successful your advertisement is overtime. Once a report is generated with your parameters you can find it on the “Reports” tab of your Ad Manager. Your report can be automatically viewed in your ads manager, or it can be exported to a different application. You will want to track the success of your campaign and alter it to be used in the future for continued success.
If you are without a marketing department, or much time, this process might be a bit out of reach for you. Fortunately, JoomConnect has created a solution that will allow you to create the perfect Facebook advertisement for your business, without the time commitment. JoomConnect takes Facebook Advertising one step further as tracking pixels are included in advertisements which can assist in additional marketing to users who clicked on the advertisement but decided not to move further. If this is something you think your business could benefit from, or you have any questions about how your MSP should be using Facebook to promote your business and increase brand awareness, contact us today on our website. Stay tuned for part 4 of this Facebook Advertising Series.
For a complete Facebook Advertising Terminology guide click here.
This is the third of a seven-part series. Read the rest of the series by clicking this tag: Facebook Ad Guide. If you’d like to learn more about advertising on Facebook keep an eye on our blogs or sign up for our newsletter!
Interested in advertising on Facebook but you can’t find the time to manage your ads? Contact us today.
About the author
![]()

Blog Categories
Grab this article

Comments